It was a rainy Saturday afternoon, the kind where the sky looks like a watercolor painting and the scent of wet earth sneaks through the open window. I was curled up on the kitchen floor, a wooden spoon in hand, watching the steam rise from a pot that had been simmering for what felt like an eternity. The moment I lifted the lid, a cloud of fragrant steam hit me—sweet onions, caramelized carrots, and that unmistakable, comforting aroma of Japanese curry that instantly wrapped my senses in a warm hug. I could hear the faint sizzle of the roux melting into the broth, and my stomach growled in agreement, promising that this humble dish would become the centerpiece of many family gatherings to come.
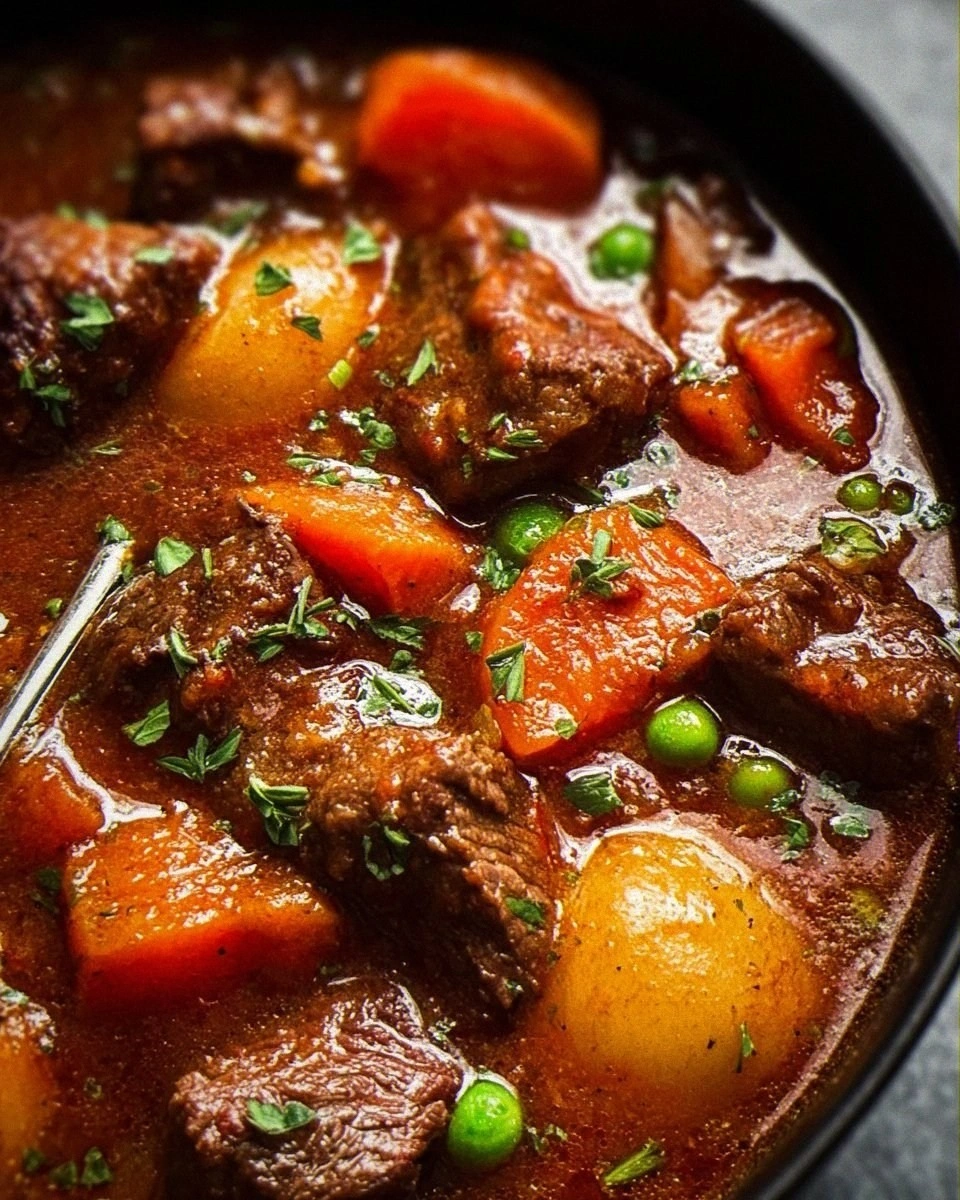
What makes this Japanese curry truly irresistible is its ability to balance deep, umami-rich flavors with a gentle sweetness that never feels heavy. The buttery melt of the curry roux, combined with the tender bite of chicken thighs and the soft, buttery texture of waxy potatoes, creates a harmony that feels both familiar and exotic at the same time. Imagine a spoonful that coats your palate with silky sauce, while the carrots add a subtle crunch and the green onions sprinkle a burst of fresh color on top. That contrast of textures and flavors is why this dish has become a comfort staple in my home, especially when the weather turns chilly and everyone craves something hearty.
But here's the thing: the secret to a perfect Japanese curry isn’t just in the roux you buy off the shelf; it’s in the little details that many home cooks overlook. Have you ever wondered why restaurant versions taste so different, even when they use the same brand of roux? The answer lies in the quality of the chicken, the way you sauté the onions, and the timing of when you add each ingredient. I once rushed the caramelization step and ended up with a flat, bland sauce—trust me, that was a lesson learned the hard way.
Now, I’m about to walk you through every step, from selecting the freshest ingredients to the final garnish that makes this dish pop on the plate. Along the way, I’ll sprinkle in a few tricks that will elevate your curry from good to unforgettable. The best part? You won’t need any fancy equipment—just a sturdy pot, a keen nose, and a willingness to taste as you go. Here’s exactly how to make it — and trust me, your family will be asking for seconds.
🌟 Why This Recipe Works
- Flavor Depth: The combination of sautéed onions, sweet carrots, and a rich Japanese curry roux creates layers of flavor that develop over time, delivering a deep, comforting taste that’s hard to replicate with shortcuts.
- Texture Harmony: By using boneless chicken thighs, waxy potatoes, and bite-sized carrots, the dish offers a perfect mix of tender meat, creamy potatoes, and a slight crunch from the vegetables, keeping each bite interesting.
- Ease of Execution: Despite its gourmet feel, the recipe requires only a handful of steps and common kitchen tools, making it accessible for cooks of any skill level.
- Time Efficiency: With a total cooking time under an hour, you can have a soul‑warming meal on the table even on a busy weekday, without sacrificing flavor.
- Versatility: This curry serves as a base that can be customized with additional proteins, vegetables, or even a splash of coconut milk for a different twist, allowing you to adapt it to your pantry and preferences.
- Nutrition Balance: The dish provides a good balance of protein from chicken, complex carbs from potatoes, and essential vitamins from carrots and onions, making it a wholesome option for the whole family.
- Crowd‑Pleasing Factor: Its mild heat level (adjustable with the roux) and familiar flavors make it a hit with both kids and adults, ensuring everyone leaves the table satisfied.
🥗 Ingredients Breakdown
The Foundation: Meat & Potatoes
Chicken thighs are the heart of this curry, and using boneless pieces ensures each bite stays juicy and succulent. Their higher fat content compared to breasts keeps the sauce rich and prevents the meat from drying out during the simmer. If you’re looking for a leaner option, you can substitute skinless chicken breast, but be prepared for a slightly less buttery mouthfeel. As for the potatoes, waxy varieties like Yukon Gold or red potatoes hold their shape beautifully, absorbing the sauce while still providing a creamy texture that contrasts nicely with the tender chicken.
Aromatics & Spices: Onions, Carrots, & Roux
Sweet onions are the aromatic backbone; when sautéed until golden, they release natural sugars that caramelize and add a subtle sweetness to the curry. Carrots, sliced into bite‑size pieces, bring a natural sweetness and a splash of orange that brightens the overall color palette. The Japanese curry roux—available in mild, medium, or hot varieties—contains a blend of flour, butter, and spices like turmeric, cumin, and fenugreek, giving the sauce its signature thick, velvety texture. If you prefer a milder flavor, start with a mild roux and add a pinch of cayenne later; for heat lovers, a hot roux will do the trick.
The Secret Weapons: Liquid & Fresh Finish
Choosing between water and broth can dramatically affect the final taste. A good-quality chicken or vegetable broth adds depth and a savory backbone, while water keeps the flavor clean and lets the roux shine. I personally love using low‑sodium chicken broth to enhance the umami without overwhelming the dish. Finally, thinly sliced green onions are added at the very end; their fresh, peppery bite cuts through the richness and adds a pop of vibrant green that makes the plate look as good as it tastes.
Optional Enhancements
If you’re feeling adventurous, a splash of mirin or a dash of soy sauce can add a subtle sweetness and depth. Some families also like to toss in a handful of peas or a drizzle of sesame oil for an extra layer of texture and flavor. Remember, the beauty of this curry lies in its flexibility—feel free to experiment, but always keep the core balance of sweet, savory, and comforting in mind.
With your ingredients prepped and ready, let's get cooking. Here's where the fun really begins...

🍳 Step-by-Step Instructions
Heat a large, heavy‑bottomed pot over medium heat and add a generous drizzle of vegetable oil. Once the oil shimmers, add the chicken thighs, seasoning them lightly with salt and pepper. Sear the pieces for about 3‑4 minutes per side, until they develop a golden crust that locks in juices. The sizzling sound and the aroma of caramelizing meat signal that you’re on the right track. Remove the chicken and set aside; this step builds the foundational flavor for the entire curry.
In the same pot, add the sliced onions, stirring them into the remaining oil and chicken drippings. Cook them slowly, stirring occasionally, for 8‑10 minutes until they turn a deep amber and start to smell sweet. Here’s the secret: low and slow is the key—rushing this step will leave the onions raw and the curry flat. Once the onions are caramelized, you’ll notice a subtle perfume that fills the kitchen, hinting at the richness to come.
💡 Pro Tip: If the onions start to stick, deglaze with a splash of broth or water, scraping up the browned bits; these are flavor gold.Add the carrot pieces and diced potatoes to the pot, stirring them into the onions for about 2 minutes. This brief sauté helps the vegetables coat in the flavorful base and prevents them from becoming mushy later. You’ll hear a faint crackle as the vegetables meet the hot pan—listen for that as a sign they’re absorbing the aromatics. Season lightly with a pinch of salt, then let the mixture cook for another 3 minutes, allowing the carrots to soften just a touch.
Return the seared chicken thighs to the pot, arranging them on top of the vegetable bed. Pour in enough water or broth to just cover the ingredients—usually about 3 cups, depending on the size of your pot. Bring the liquid to a gentle boil, then reduce the heat to a low simmer. At this stage, you’ll see tiny bubbles forming around the edges; that’s the perfect cue to cover the pot and let everything meld for 15‑20 minutes.
⚠️ Common Mistake: Lifting the lid too often releases steam and slows down the cooking process; keep it on unless you need to stir.After the vegetables are fork‑tender and the chicken is cooked through, gently stir in the Japanese curry roux blocks (usually 1‑2 blocks, depending on desired thickness). Break the roux into smaller pieces and let them dissolve completely, stirring constantly to avoid lumps. As the roux melts, the sauce will thicken, turning a glossy, caramel‑brown hue that coats the back of a spoon. This is the moment the curry truly transforms, becoming silky and rich.
Taste the sauce and adjust seasoning with a splash of soy sauce, a pinch of sugar, or a dash of mirin if you like a sweeter profile. Remember, the flavor deepens after a few minutes of resting, so don’t over‑season at this stage. If the curry feels too thick, thin it with a little extra broth or water, stirring until you reach the desired consistency. The sauce should cling to the vegetables but still flow easily when you tilt the pot.
Turn off the heat and let the curry rest, covered, for 5‑10 minutes. This resting period allows the flavors to meld, creating that comforting, cohesive taste you crave. While it rests, the chicken will reabsorb some of the sauce, making each bite extra juicy. If you’re in a hurry, you can skip this step, but trust me—patience makes the difference between good and unforgettable.
Just before serving, sprinkle the thinly sliced green onions over the top for a fresh burst of color and a mild peppery kick. Serve the curry hot over steamed Japanese short‑grain rice, or alongside a warm bowl of udon noodles for a heartier meal. The steam rising from the rice mingles with the curry’s aroma, creating a sensory experience that’s both soothing and invigorating. Go ahead, take a taste — you’ll know exactly when it’s right.
And there you have it! But before you dig in, let me share some tips that will take this from great to absolutely unforgettable...
🔐 Expert Tips for Perfect Results
The Taste Test Trick
Always taste your curry a few minutes before the end of cooking. This gives you a chance to balance salt, sweetness, and spice while the flavors are still developing. I keep a small spoon handy and take a tiny sip, then adjust with a pinch of salt or a drizzle of soy sauce. The secret is to add seasoning gradually—once it’s over‑seasoned, there’s no easy fix.
Why Resting Time Matters More Than You Think
Allowing the curry to rest off the heat lets the starches in the roux fully hydrate, resulting in a smoother texture. I’ve found that a 10‑minute rest makes the sauce feel velvety on the tongue, whereas serving it immediately can feel slightly grainy. Cover the pot with a clean kitchen towel to keep the heat in while it rests.
The Seasoning Secret Pros Won’t Tell You
A splash of apple cider vinegar at the very end brightens the whole dish, cutting through the richness and adding a subtle tang. It’s a trick I learned from a Japanese chef who swore by it for every curry he made. Just a teaspoon will do; you’ll notice the flavors pop instantly.
Choosing the Right Pot
A heavy‑bottomed pot distributes heat evenly, preventing hot spots that can scorch the roux. I use a cast‑iron Dutch oven for its excellent heat retention, but a thick stainless‑steel pot works just as well. Avoid thin aluminum pans, as they can cause the roux to stick and burn.
Balancing Sweetness and Savory
If you find the curry leaning too sweet because of the caramelized onions, add a pinch of smoked paprika or a dash of Worcestershire sauce. These ingredients introduce a gentle smoky note that counteracts excess sweetness without adding heat. I once over‑caramelized the onions, and this simple tweak saved the dish.
The Best Part? Garnish with Flair
Beyond green onions, try a sprinkle of toasted sesame seeds or a few shreds of nori for an umami boost. I love the contrast of the nutty sesame against the creamy sauce. It’s a small addition that makes the plate look restaurant‑ready and adds an extra layer of texture.
🌈 Delicious Variations to Try
One of my favorite things about this recipe is how versatile it is. Here are some twists I've tried and loved:
Coconut Curry Fusion
Swap half of the broth for coconut milk and add a teaspoon of grated fresh ginger. The result is a creamy, tropical version with a subtle sweetness that pairs beautifully with the chicken and vegetables. Garnish with cilantro for an extra burst of freshness.
Vegetarian Delight
Replace the chicken thighs with firm tofu cubes or a medley of mushrooms like shiitake and cremini. Use vegetable broth and add a handful of snap peas for crunch. This variation maintains the hearty texture while keeping the dish entirely plant‑based.
Spicy Kick
Add a sliced jalapeño or a tablespoon of Japanese chili oil when you stir in the roux. For those who love heat, a pinch of cayenne pepper will turn the curry into a fiery delight without overwhelming the core flavors.
Apple & Sweet Potato Curry
Introduce diced sweet potatoes and a grated apple into the pot along with the carrots. The natural sugars from the apple and sweet potato amplify the curry’s sweet‑savory balance, creating a dish that’s perfect for autumn evenings.
Miso‑Infused Depth
Stir in a tablespoon of white miso paste during the final simmer. The miso adds a deep, fermented umami that elevates the curry to a more complex flavor profile, reminiscent of traditional Japanese home cooking.
Seafood Surprise
Swap the chicken for a mix of shrimp and white fish fillets. Add them in the last 5 minutes of cooking to prevent overcooking. The delicate seafood absorbs the curry sauce beautifully, offering a light yet satisfying alternative.
📦 Storage & Reheating Tips
Refrigerator Storage
Allow the curry to cool to room temperature before transferring it to an airtight container. It will keep safely in the fridge for up to 3 days. For best texture, store the rice separately and reheat both components together.
Freezing Instructions
Portion the curry into freezer‑safe bags or containers, leaving a little headspace for expansion. It freezes well for up to 2 months. When ready to use, thaw overnight in the refrigerator and reheat gently on the stove, adding a splash of broth to revive the sauce.
Reheating Methods
The trick to reheating without drying it out? A splash of water or broth and a low simmer, stirring frequently. In the microwave, cover the bowl with a damp paper towel and heat in 30‑second intervals, stirring in between. This ensures even heating and preserves the creamy texture.